Monday, 28 July 2008
I Dare You Swap: Carol's Challenge
I Dare You Swap: Katherine's Challenge
This is what I made for Katherine for Nicks' I Dare You swap (details below). Katherine's challenge to me was to create something using hand drawn elements only. I have to admit, I struggled a bit with this one (I think it was the "only" bit that did it!)
I decided on a gothic arch as I wanted to do something bigger than an ATC but without it being TOO big (because I was scared). The lady in the middle is a pencil drawing and I've inked around her to brighten her up a bit. The flowers and vines around the edges are drawn in ink and coloured using Sharpie pens and I drew the individual petals of the large flower at the bottom and then inked them and stuck them together to make the flower. The swirls and the tiny butterfly at the bottom are also drawn in ink and coloured with Sharpie pens.
Saturday, 26 July 2008
I Dare You Swap: My Challenge from Nicks
This is what I made for Nicks. Nicks challenged me to make her something using a stamp I'd bought and never used. When I looked through my stamps, these Egyptian ones were the only ones I could find that I hadn't used. I have to confess that I've used the Tutanhkhamun one before once but I haven't used any of the others at all.
I also attached the Tutankhamun masks which I stamped on shrink plastic .
Inside the pyramid, I stamped around the edges with an arches stamp and hieroglyphics and pattern stamps, and I attached another Tutankhamun mask which I stamped into clay and painted with gold and metallic blue acrylics and added gems for the eyes. I added a bit of distress inked card behind which I stamped with some of the Egyptian images and finally added some micro beads and tiny gems around the edges of the bottom square.
Wednesday, 23 July 2008
Cards!
Tuesday, 22 July 2008
Round Robin Journal: My Page for Femmy
This is my latest page for Astrid's Round Robin Challenge. This one's for Femmy and is on the theme of "Outdoors".
I chose a very natural countryside kind of look for the page as this is what the outdoors means to me. I started by creating a layered stamped and emboss resist background which I coloured using Distress Inks in browns and greens. I wanted to use something natural on the page so I chose some pieces of bark, which I've layered under the main image. I coloured the image with Distress Inks, cut out and added the birds and then finally added a skeleton leaf (also coloured with Distress Inks) and the quote by Keats.
Alice in Wonderland
I started with the Tweedledum and Tweedledee one (yes, I know they're Looking Glass characters but I LOVE them, and anyway Kathleen says it's OK). The background is PVA and tissue paper coloured using Radiant Rain sprays. I stamped the image in black Stazon on a separate piece of card and coloured it using watercolours, cut it out and stuck it on then added some mesh, the word Adventures (stamped) and a shiny star brad.
I was slow getting started with these as I found myself lacking in inspiration even though I had new stamps (!), but once I got started I could have gone on and on with them. I also originally did a Mad Hatter ATC using lots of bright colours but I didn't like it so it ended up in the bin.
Monday, 21 July 2008
Altered Wall Light
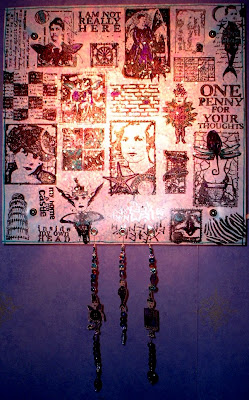
The folks at Paperartsy have been running a competition to see what people can do using Paperartsy stamps and lightshades. I decided to enter as I thought it was a fun idea, (although I don't really think I stand much chance of winning.) I spent hours looking for a light shade I could actually stamp on and finally found this wall light for £1.50 in the Ikea sale! It has interchangeable shades so I'll probably have a go at doing some more when I have a bit more time.
I decorated the shade on the back using alcohol inks so that the light would shine through and show up the pattern, then stamped various Paperartsy images on the front and coloured bits of them with Sharpie pens. (The shade is made from a kind of plasticy stuff, so I was a bit limited in what I could do). I also drew rough lines around the edges with a Sharpie pen. Finally I added eyelets, wire, beads and some shrink plastic Paperartsy stamped people at the bottom for the light to shine through.
Unfortunately my photography skills (or complete lack of them) have really let me down with this one and the light looks much better in real life. I have come to the conclusion that taking a photo of a light is virtually impossible. Above you can see one photo with the flash and one without and also a close up of the detail at the bottom. These were the best ones I could get despite taking hundreds of photos with various different camera settings and different lighting!
I've been busy over the weekend working on various other projects but can't post piccies at the moment, firstly because I want some of the bits and pieces to reach their destinations first and secondly because Matt's pinched the camera and taken it to work with him!
Thursday, 17 July 2008
Oh No! I Look Like a Man!
The first thing I did was went and got all my hair cut off (I don't recognise myself). Now, I love my children, I really do, but their verdicts when I picked them up tonight were not exactly flattering. Alex is nearly 6. His comments were "You look like a man", and "I hope your hair grows back really quickly". (It's still almost down to my shoulders). Adam (3) has just been giving me funny looks every time I look at him. Matt's not seen it yet, but he'll probably hate it too because he liked it long. At least I like it, and that's the important thing.
Finally I made the ATCs shown here. They're for a swap hosted by Crafty Vonx on the Docrafts forum on the theme "A Touch of Texture" There have to be at least three different textures on each ATC. The top one was done by sticking various textured items onto a mountboard base using PVA glue. The face is moulded using Makin's Clay and then I've pressed some sequin mesh into it. I painted the whole lot black and then dry brushed it in bronze. The crown and hearts are made from metal which I placed on a foam mat and stabbed repeatedly with a needle to texturise it. (I discovered this is a brilliant way to relieve stress!)
For the second ATC I started with an inked mountboard base and stuck sequin waste and fabric mesh onto it. Next I inked up and burnt a baby wipe and tore a piece off it and stuck it on. The square tile is wood which I inked and then covered with three layers of UTEE and stamped the owl into it. I was hoping some of the wood grain would show through but unfortunately I chose a stamp that was too detailed. Also the wood has had an effect that I hadn't expected, and when I left the UTEE to dry it curled up a bit. I thought about taking it off and using a mountboard tile instead, but decided I quite like the effect. Finally I added the button and fibres at the bottom to finish it off.
Wednesday, 16 July 2008
Round Robin Journal: My Page for Astrid
This is my page for Astrid on the theme "Children of a Bygone Age". The background is gessoed, inked with Distress Inks and stamped and I've layered the music and the children image over the top. The children are an image transfer done using Mod Podge. I've added a piece of vintage lace at the bottom which I've also coloured using Distress Inks, a Grungeboard flourish and some layered Prima Flowers. The butterflies are stamped, cut out and stuck on, and the song words are handwritten.
Sunday, 13 July 2008
Metal Madness
Painting!
I am in awe of Paula's drawing and painting skills, so if you want to see some really good stuff, check out her blog from the link above.
An Assortment of Angels
The last one is a gesso image transfer of a stone angel onto a stamped background. I then inked it, added the flourishes in gold embossing powder, the word Angel and the paper flower.
Friday, 11 July 2008
HAPPY BIRTHDAY NICKS!!!
I also made an altered mint tin. (Strange as it may seem, I've never done one of these before). I started by sanding all the paint off - err, I think I'll just paint over it next time - and then coloured the bare metal using alcohol inks. I've added a sun moulded from Friendly Plastic and some accent beads. I wanted to keep the inside simple so it could be used, so I've painted the bottom and added some mesh coloured with a Sharpie pen and some seed beads, which I've embedded in a layer of UTEE. I originally painted the inside of the top as well, but then it wouldn't shut so I had to scrap that idea. I settled on colouring it with alcohol ink and Sharpie pens.
Monday, 7 July 2008
Think Monday Think ATC: Colourful
This week's theme on Think Monday Think ATC is colourful, so here's my bright and funky ATC. I've been dying to try something along these lines for ages, so it was just the inspiration I needed.The background is inked with painted flowers which I've outlined with a black pen. The face and hands are printed images and all the other bits are drawn and cut out. The writing is done by hand.
Saturday, 5 July 2008
Red, White and Blue
These are two ATCs I've made for Cazro's colour swap which is red, white and blue for this month. I'm going to do another but it will have to wait a few days. For the Carnival Mask I started with an acrylic paint background (inspired by Katherine's swirly background that she did on my house). I dripped the paints onto a piece of mountboard and swirled them around with the end of a paintbrush, then I heated them with my heat gun to create some texture. The mask is made from air dry clay and painted in the same colours, with tiny gems for the eyes and fibres for the hair. I painted the word "carnival " onto white card, stuck it on and stuck flower gems at the corners to look like they were holding it on.
For the second one, I started with part of a book page stuck onto card, coloured it using distress inks and then stamped some text on a piece of textured card and also gave that a bit of colour using a distrss ink. Next I added a bit of mesh and lace to the background for a bit of texture and stamped the woman onto a piece of white card, cut her out and stuck her on. Finally I added the other bits and pieces to make it a bit more interesting.
This is not a colour scheme I would normally use so I found these quite difficult!
Award!
Well, thank you very much to Astrid, Shaz and Paula who have all nominated me for this award. I am honoured!
The rules for receiving this award are:
1. The winner can put the logo on her blog.
2. Link the person you received your award from.
3. Nominate at least 7 other blogs.
4. Put links of those blogs on yours.
5. Leave a message on the blogs of the people you've nominated.
Subscribe to:
Posts (Atom)